
I'll be sporting a lovely black and white print dress for this year's luncheon but alas, I had no fascinator to match. How sad, I hear you say. Well let's remedy that as I share how I made one that suits my dress perfectly. As complicated as fascinators look, they are really simple to make and a whole lot kinder on the budget than buying a ready made one.
I bought my headband base and assorted feathers from Lincraft's Spring Racing line, and satin bow hair clips (bobby pins) and a fabric flower hair clip from Cosmetics Plus. You'll also need scissors for cutting wire and a hot glue gun.
 Firstly trim away the clips from the back of the flower and bow.
 Cut away the excess wire from the Feather Stripped Coque.
 Glue the marabou tuft and feather coque in place on the headband base.
 The flower I bought was already trimmed with black glitter but it was looking a little tired. Bargains are often like that - just in need of a little touch up to breathe some freshness back into them. Luckily, I had some black glitter from Art Glitter Institute on hand and their wonderful Designer Dries Clear adhesive. Just a light touch around the edges was all it needed.
 Sprinkle with glitter and tap off the excess.
 Brush away the fine strays or you'll be wearing them over your makeup on the day!
 This next part was an afterthought and the materials aren't photographed above. I didn't like the black quill feather I'd bought so I substituted it with some tubular mesh from my stash and fashioned it into a 6 loop bow, binding it together with black wire. I placed some smoke grey glass pearls in the tube before tying the ends off.
 Both the tube bow and satin bow were glued into place leaving just enough room for the flower to nestle in (which will cover all the excess hot glue).
 More hot glue to attach the flower over the bows.....
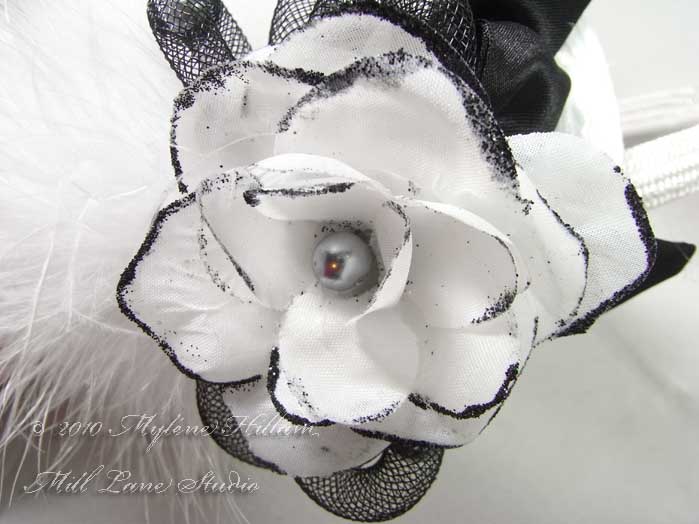
 and then another dab of hot glue for a pearl to be placed in the centre.
 Voilà!..... one fabulously fancy piece of fripperie - a fascinator that didn't break the bank!
 Of course, we all know that Melbourne Cup is NOT about horse racing but rather about the Fashions of the Field! So come on girls, frock up, don a fascinator (or hat) and enjoy the one and only day of the year when you can wear the finest plumes you can find.
I hope you enjoy a luncheon with friends or work colleagues and that if you have a little flutter on the gee-gees, that you back a winner.
'Til next time.....


If you can't get enough of My Tutorials and you want even more inspiration, click here to find my books and printable pdfs

