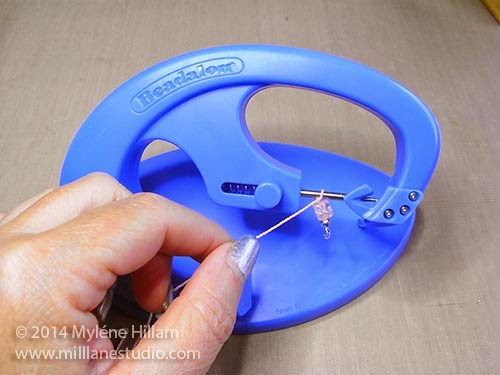
Earlier this year I saw Beadalon's cool new Knot-A-Bead Tool in action at CHA. It made quick work of knotting strands of beads and the demonstrator made it look SO EASY. But if you've ever watched a product demo at a craft show, you'll know that it looked much easier when the demonstrator did it than when you tried to do it at home. But I'm happy to say that this is NOT one of those occasions.... this tool is every bit as easy to use as it looks and I'm pretty impressed with how well it works. It's definitely a tool worth adding to my collection!
So let's take a look at the knotting process.
You'll need:
Beadalon Knot-a-Bead tool
Silk thread
Clam shell bead tips (aka calottes)
G-S Hypo Cement
Needle Tool
Beads or pearls of your choice
I'm working with silk thread which comes with a needle already attached. It even has a knotted end (so it won't fray) so I've just threaded on a calotte (from the inside of the hole).
Next, string your beading pattern onto the thread. I like to place a bead stopper on the thread to keep the beads from slipping off the needle again. Slide the first bead down to the calotte and place the calotte and bead over the metal spindle.
Pick up the bead in your right hand and tie an overhand knot around the thread in your left hand
Pull the knot up so that the bead sits next to the spindle
Then pull the thread UPWARDS. This makes sure that the knot is right up alongside the bead. This next bit is important.... push the bead over the spindle, towards the back of the tool so that the thread is in front.
Now slide the bead to the right of the spindle and place the thread through the hook. You'll need to do this with your right hand but I'm doing it with my left hand because I'm holding the camera with my right. With your left hand, slide the button to the left whilst pulling the cord with your right hand. I found that I could work the knot right up to the bead by doing this slowly.
Keep sliding the beads along the thread, and knotting them one at a time until all the beads are knotted. To finish off a strand, string on another calotte (from the outside of the hole) and create the knot as before.
To secure the knots so they won't unravel, place a dab of GS-Hypo Cement or nail polish on the knot. When it's dry, trim away the excess thread and close the calotte over the knot.
How to Fix Mistakes
This is such an easy way to string a necklace and a great alternative to using eye pins to connect components together. But sometimes, you get it wrong and forget to place a knot in the right place..... oops!It's easy to fix if you notice it straight away. Use a needle tool to loosen the knot, undo it and then continue on your way. As long as your design doesn't have lengths of unbeaded cord in between your beading pattern, any kinks in the stringing material should be hidden.
I have to say, that the instructions that come with the Knot-A-Bead Tool are pretty clear once you understand them but if you can't make heads or tails of them, then check out Beadalon's YouTube video and watch the tool in action - all of a sudden, those written instructions will become crystal clear!
Pin this Technique!
Happy knotting!
'Til next time.....

If you can't get enough of My Tutorials and you want even more inspiration, click here to find my books and printable pdfs


