If you've been working with resin for a while, you might have noticed some of
your earliest pieces just don't seem to have the clarity of your most recent
pieces... they seem to be slightly discoloured or they've taken on a yellowish
tinge.
As disappointing as it is, this is actually a normal phenomenon.
It's a fact that all resins will yellow... eventually!
For some resins, that can be as little as a few months. For other resins, it
can be a number of years.
You may have seen resin kits where one part of the resin looks slightly
yellow.
The yellowing usually occurs in the hardener side first, due to the amines
that are present. Without getting too technical, when they're exposed to
oxygen (like when you open and close the bottle), they oxidise, or turn brown.
That's why RESIN HAS A SHORT SHELF LIFE.
But just because your resin hardener has yellowed, doesn't mean you
have to discard it. In most cases, it will still cure properly... it just
won't be as clear as fresh resin.
So we know that resin yellows in the bottle...
But it's the yellowing that happens to your cured resin pieces that I want to
talk about today.
You might be surprised to know that part of the reason your projects have discoloured
is caused by the way you used the resin.
Some of these practices actually ACCELERATE the yellowing process so it's
important that you know what these things are because there are ways to avoid
or lessen the effect of the yellowing in your projects.
WHY RESIN YELLOWS
Here are some of the top reasons why your resin projects look yellow and
what makes it appear more noticeable (in no particular order!):
- Heat build-up or exotherm
- Exposure to UV light
- Resin poured too thick or deep for the resin you have chosen (you must choose the right resin for the depth of your pour)
- Using a sealant that isn't UV resistant to seal items that you put in resin
- Using white colourant in the resin or pouring clear resin over a white surface
- Over-torching the resin or overheating it with a heat gun to pop bubbles
1. Heat Build-up or Exotherm
When you mix resin and hardener together, the chemical reaction that happens
creates heat (an exothermic reaction). Heat is essential for the resin to
cure, but believe it or not, too much heat is a bad thing. Resin that heats up
too quickly can turn yellow.
These are some of the things that can cause heat to build up rapidly:
These are some of the things that can cause heat to build up rapidly:
- mixing larger volumes than the manufacturer recommends,
- pouring into deep moulds, which concentrates the heat
- high room temperatures.
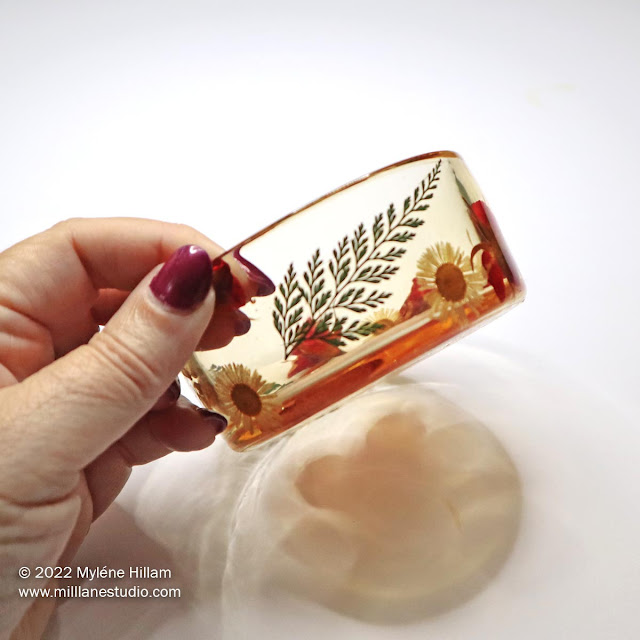
When any of these things happen, the resin cures too quickly and that can turn
clear resin yellow as it cures, even if it was completely clear when you
poured it. This trinket bowl was crystal clear when it was poured into the
mould but it yellowed DURING curing.
The instructions in some resin kits tell you the
maximum amount of resin to mix so that you don't run into these
problems.
If yours doesn't, contact the manufacturer to find out their recommendation.
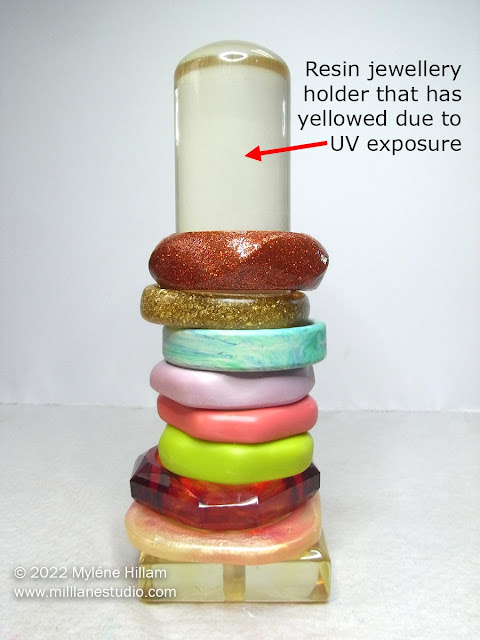
2. Exposure to UV Light
UV LIGHT IS RESIN'S ENEMY!
It breaks down the chemical molecules in cured resin and causes the resin to
yellow. And once cured resin has begun to yellow, there's no stopping it, even
if the resin is no longer exposed to UV.
So always keep your resin projects out of direct sunlight. Even fluorescent
lights can have an effect on resin's ability to resist yellowing.
Beware of exposing your resin pieces to the sun - it can cause other damage
too: it can cause the epoxy to break down and the surface can crack and become
chalky, and you'll lose the lovely glossy finish that resin is known
for.
The good news is that there are epoxy resins available with
UV inhibitors and HALS (hindered amine light stabiliser) that delay the
yellowing of resin. For long term non-yellowing, choose a resin with at least
ONE of these two features. Or even better, choose one with both, like these:
- Art Resin - perfect for artwork
- The Epoxy Store's Clearcast 7050 - for artwork and shallow moulds (up to 6mm or 1/4")
- Unity Resin Premium Epoxy - for artwork and shallow moulds (e.g. coasters)
These additives will delay or even prevent yellowing, so when you need resin
that doesn't discolour over time, it's worth paying the extra for these
resins.
Bonus tip: Avoid premature yellowing of your resin hardener by storing it
away from direct light in an area where it's not exposed to high
temperatures.
If your resin kit came in a box, keep it in the box for added
protection.
3. Resin Poured Too Thick or Deep for the Resin You Have Chosen
When you pour a coating resin (one intended for art) into a mould, it won't be
as crystal clear as it would be if it were poured onto a surface. The build-up of
depth actually gives the resin a yellowish tinge.
If you want to fill a mould with resin, it's essential that you choose a casting epoxy, not a coating epoxy.
If you want to fill a mould with resin, it's essential that you choose a casting epoxy, not a coating epoxy.
In the photo above, I ran out of deep-pour resin in the middle of the project and decided to finish it with layers of coating resin to top up the mould. That was a BIG MISTAKE!
You can see how those thick layers of coating resin have yellowed drastically. This is a perfect example of using the wrong type of resin. Coating resin is not designed to be poured this thick. When used as a thin top layer, it is crystal clear, but when built up in multiple layers, it will appear amber.
Casting epoxies are designed for thicker/deeper pours, like filling a mould.
Read more about why you need to
choose the right type of epoxy for your project here.
Check the bottle or the instructions to find out how deep you can pour with
the resin you have chosen.
4. Using a Sealant That Isn't UV Resistant
When you place paper images or dried flowers in resin, it pays to
seal them first so you don't get "wet" spots.
But many of the common sealants YELLOW WITH AGE and even if you use a resin
that stays clear, a yellowing sealant can make clear resin look like it's
yellowed.
Choose a sealant that:
- dries clear
- is UV resistant
- is non-yellowing.
Tip: If you've already got an old, opened bottle of sealant/white craft
glue, then check to see if there's any dried glue/sealant around the
pouring spout. If there's any discolouration, i.e. if it hasn't dried
clear, then avoid using that product to seal anything you want to put in
resin.
5. Using White Colourant in the Resin or Pouring Clear Resin Over a White Surface
Using white colourant in resin is another instance you'll not
ice that the resin has yellowed. It's not necessarily the white pigment that has caused the resin to yellow, but areas of white resin will become a shade of cream (or yellow in severe cases). Yellowing is also more noticeable in clear resin that has been applied over a white surface.
ice that the resin has yellowed. It's not necessarily the white pigment that has caused the resin to yellow, but areas of white resin will become a shade of cream (or yellow in severe cases). Yellowing is also more noticeable in clear resin that has been applied over a white surface.
Tip: Minimise the effect of yellowing resin by colouring it! If you avoid
clear or white resin, you won't notice the resin yellowing.
6. Over-Torching the Resin
One of the most effective ways to pop bubbles is to briefly pass a flame (or
butane torch) over the resin once it's poured.
And as incredibly satisfying as it is to watch the bubbles pop, a flame (or
a heat gun) can cause other problems if too much heat is applied when trying
to pop stubborn bubbles.
Concentrating the flame/heat in one spot for too long can cause the resin to
smoke (very dangerous).
And it's another contributor to yellowed resin. Applying
excessive heat can scorch the resin in those areas, causing spots to
yellow and discolour.
The trick with using butane torches, BBQ lighters and heat guns is to
pass them BRIEFLY across the surface and not linger in one spot.
So remember,
you can control a lot of the conditions that cause resin to yellow.
And don't forget my BONUS TIP:
Store your resin in the box so that it's not exposed to UV light!
Pin These Tips for Later!

Subscribe to my email list and learn how to resin like an expert.


Mylene, Thanks for all the tips!! Terri
ReplyDeleteTerri, I hope they help you avoid yellowing resin!
DeleteThank you! This helps tremendously. I've tried 5 or 6 well-liked brands, but they all haved turned yellow, some as quickly as w/in 4 months! So disheartening & expensive. Plus, I need my resin to stay clear for art I've sold!
ReplyDeleteHi Janille,
DeleteIt's impossible to completely eliminate yellowing... the chemical makeup of resin predisposes all epoxies to yellow in time. Epoxies with HALS resist yellowing for longer, as will those with UV inhibitors. The best known of these is Art Resin: https://amzn.to/3ZwhXJW
Another tip is to avoid white or clear areas in your art so that any yellowing is less noticeable.
Myléne