Measuring resin can be challenging!
Have you ever struggled to get the right amounts of resin and hardener?
It's not so hard with a 1:1 ratio. But it's not so easy when your resin is a
2:1 mix ratio... or a 3:1 ratio. That's when it can be CONFUSING!
You probably know that if you get the measurements wrong, (or you don't mix
thoroughly, or your room is too cold) you end up with resin that doesn't cure
properly... it stays soft and bendy. Or worse, it stays sticky. And it ruins
your whole project!
If this sounds like you, then you need an easy-to-understand method to work
out how much of each part to pour out.
And I've got 3 methods for you to choose from!
But first, a little about ratios and what they actually mean.
Your bottles of resin and hardener are marked with a ratio that's used to
measure out the right amount of each part. It's different for every brand but
most commonly, you'll find 1:1 and 2:1 ratios. The resin is Part A and the
hardener is Part B.
In a 1:1 ratio epoxy, you need 1 part of Part A (the resin) and one part of
Part B (the hardener).
In a 2:1 mix ratio, you need 2 parts of Part A and one part of Part B.
Now that you know what the numbers in the ratio mean, let's look at how to
measure the right amount of each part.
Apart from your resin, you'll need cups with graduations marked on them so you
have measurements to go by. For small amounts,
these are my favourites. They have metric and imperial measurements on them so you can use whichever
measurement you're most familiar with.
If you need larger cups, try these medium-sized cups that also have multiple measurements marked on them.
Method 1 - Multiplication
If your resin is a 1:1 resin, then you just need to measure out equal parts of
resin and hardener.
So let's skip the 1:1 and go to a 2:1 resin.
Most people find it easier to multiply numbers than divide them, so start by
measuring out Part B, the hardener. The hardener is the ":1" part of the
ratio.
Once you've poured this into a measuring cup, note the measurement and
multiply the amount by 2. This is the "2:" part of the equation, the resin.
With a 3:1 ratio resin, you'll multiply by 3 for the resin. And so on.
This method is a simple way to get the right ratio of resin to hardener.
But what if you need to know the exact amounts of resin and hardener for your
mould?
That's where this next method comes into play.
Method 2 - How to Work out the Exact Amount of Resin and Hardener to Fill Your Mould
This is an almost fool-proof method that only requires some simple maths to get it right. (I say ALMOST
fool-proof because you still have to measure it accurately!).
The good thing is, this method works with any ratio of resin to hardener and
it will work no matter how much resin your mould needs.
For this method, you'll need to know two things:
- The ratio of the resin
- and the volume of the mould (you can see how to work that out here).
With just these two things, you can work out how much Part A and how much
Part B to measure out to fill your mould exactly.
So let's start with an easy example. We'll use a 1:1 ratio resin and a mould
that holds 210ml or 7oz of resin so there are no decimals or fractions to deal with.
Now, follow the steps below:
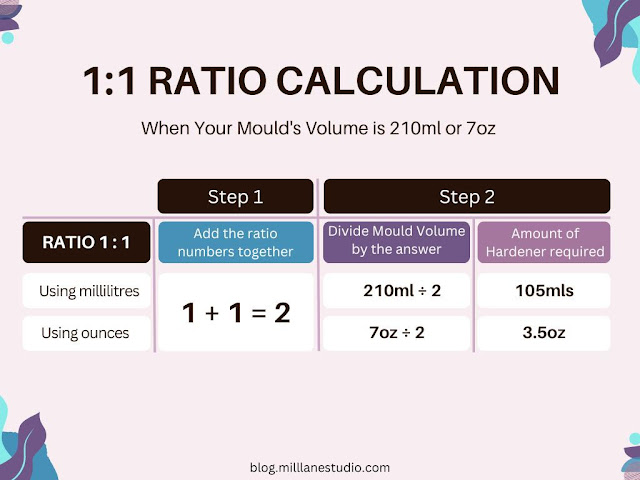
Step 1: Add the two numbers of the ratio together.
For a 1:1 ratio, the sum is:
1 + 1 = 2
The next step uses the volume of the mould. You can use either millilitres or
ounces, whichever one you're most comfortable using.
Step 2: Divide the mould volume by the answer you got in Step 1, which is 2.
So that will be:
210ml divided by 2 = 105
So the ":1" part of the ratio is 105ml
i.e 105ml of hardener.
The rest of the 210ml is the resin component (also 105ml).
Take a look at the chart below and follow the two simple steps. It's really
quite simple when you break it down like this.
OK, I know you need to see how it works in a different ratio, so let's look at
a 2:1 ratio resin.
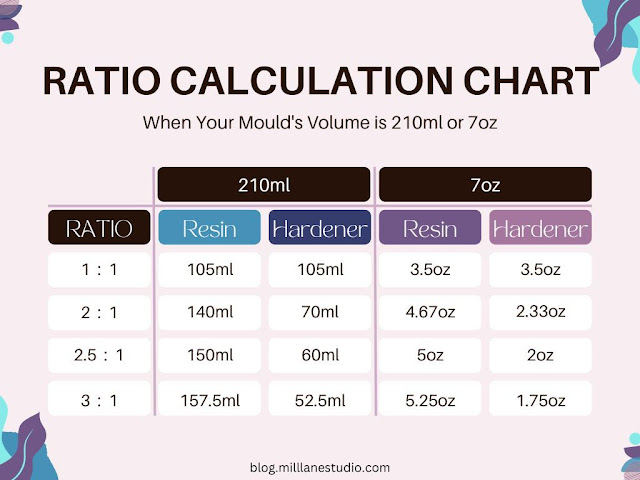
STEP 1: Add the two numbers of the ratio together: 2 + 1 = 3
STEP 2: Divide the mould volume by the answer: 210ml divided by 3 = 70ml
So the ":1" part is 70ml (the hardener) and the rest is the resin, the "2:"
part of the ratio.
You can check that by multiplying 70ml x 2 and you get 140ml.
So 2:1 ratio will be 140ml resin/70ml hardener.
In a 3:1 ratio the sum would be:
3 + 1 = 4
210 divided by 4 = 52.5ml (hardener)
Multiply that by 3 = 157.5ml (resin)
Add the two numbers together and you have 210ml resin
And one last one just to show you it works for all ratios:
2.5:1
2.5 + 1 = 3.5
210 divided by 3.5 = 60 (hardener)
Multiply that by 2.5 = 150ml (resin)
You can also see the comparison with ounces in the chart below.
If you measured your mould volume accurately, this method gives you enough
resin to fill the mould without any wastage.
METHOD 3 - Using Calibrated Measuring Cups
Ratio measuring cups
have all the ratio markings printed on the cups already. These can help you
get the right proportions of resin and hardener.
When you use ratio cups, you don't have to do maths to get the ratio right.
All you have to do is pick the correct ratio on the cup for your resin kit
and then measure the resin and hardener to the appropriate lines.
That seems simple enough... until you look at all the numbers on the
cup.
At first glance, it looks intimidating!
There are dozens of lines and hundreds of numbers and it seems confusing...
how do you know which numbers to use?!!
Luckily, it's a whole lot SIMPLER than it first looks. If you isolate the
ratio that you need, it's much easier to understand.
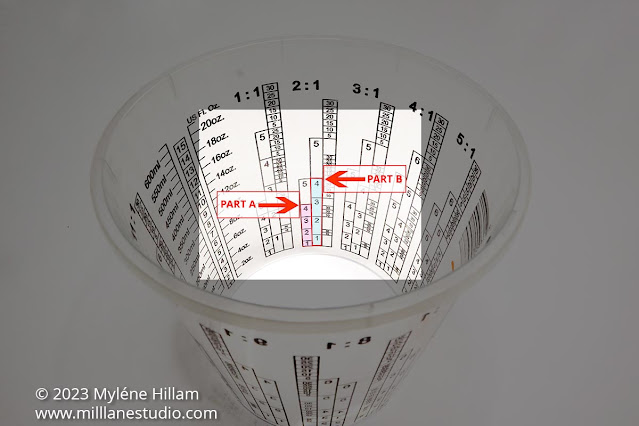
First, let's look at the cup and see what markings are there.
Around the top of the cup, you'll see the different ratios. Each ratio has 2
or more columns.
As well as the ratios, you'll see a column with volume measurements (in
millilitres and fluid ounces).
Tip: Some ratio cups have more than 2 columns for each ratio. If that's
the case, you can totally ignore the extra columns. You only need the
first two columns.
When using these cups, you need to know two things:
- how much resin you need for your project (see how to work that out here), and
- the mix ratio of your resin system
Let's say you need 300ml (that's around 10oz), and your resin is a 2:1
system.
STEP 1:
Find the 300ml mark on the cup and follow it around to the 2:1 ratio
column. The number you need is in the second column (highlighted in light
blue in the photo below). This is the amount of resin you'll end up with.
On this cup, it's the number 4.
STEP 2:
Now find the number 4 in the first column (highlighted in light pink) and
pour out Part A to this line.
STEP 3:
Pour Part B to the number 4 in the second column.
You've now measured out 300ml of resin in a 2:1 ratio
without doing any maths!
So even though it seemed daunting when you first looked at the cup, in
the end, it's SO EASY!
These ratio cups are brilliant for larger quantities of resin. Just
make sure you choose calibrated cups
like these so that your proportions are right.
How to Work Out the Volume of your Mould
There's still one more thing to know about measuring resin and that's
how to work out the amount of resin you need for your project.
All you need is a graduated measuring cup and some rice.
Fill the mould to the top with the rice.
Now pour the rice from the mould into the measuring cup.
This is how
much total resin you need to mix.
Pro Tip: Get yourself a journal and record how much each of your
resin moulds holds. It's so handy to be able to refer to it each
time you use the mould.


