Our happy couple liked the idea of seeing their initials together in the monogrammed napkin rings so we carried it a little bit further and used it as part of the theme for the celebration. For this project, I started with some paper mache letters, a ball of jute and a hot glue gun. Once again, most of the supplies for this project came from my stash and the only cost was the paper mache letters.
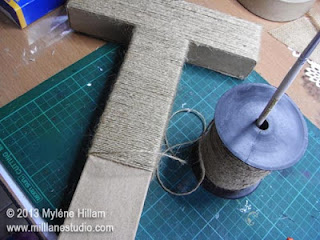
To get this project started, I used the hot glue gun to secure the first few centimetres of jute along the top edge of the T.
You need a lot of jute for this project. This roll holds 180 metres and didn't want to see it all unravel on the studio floor. Imagine the fun Kitty Kat would have had with that! I found it helpful to use a paint brush as a spindle so that I could control the spool. If you have a paper towel holder with a narrow enough dowel, that would be ideal.
Then it was just a matter of wrapping and wrapping and wrapping the jute around the letter securing it with hot glue every once in a while. The "T" shape was really easy to wrap. The "S" was a lot more of a challenge and used an enormous amount of jute.
Once the whole letter was covered I punched a strip of copy paper using the Flower Burst punch from EK Success to make a border along one edge. It's mounted with Glue Arts Extreme Tac mounting squares.
Then it was time to embellish the letters with flowers. This one uses Tim Holtz Tattered Florals. To make the flowers look more like roses, I cut away one petal from the first layer, two from the second layer and three from the third layer. I used the pieces I cut away to create the bud of the rose and then hot glue it all together.

And here's the "S" - it just ate the jute on those curves.
So how much of this roll was left after this project?
Well, none! I had to buy another spool to finish it!
But I love the look of the jute. It has a down to earth feeling about it - very much like the happy couple.
In my next post I'll show you the another variation of this idea.
'Til next time.....

If you can't get enough of My Tutorials and you want even more inspiration, click here to find my books and printable pdfs


