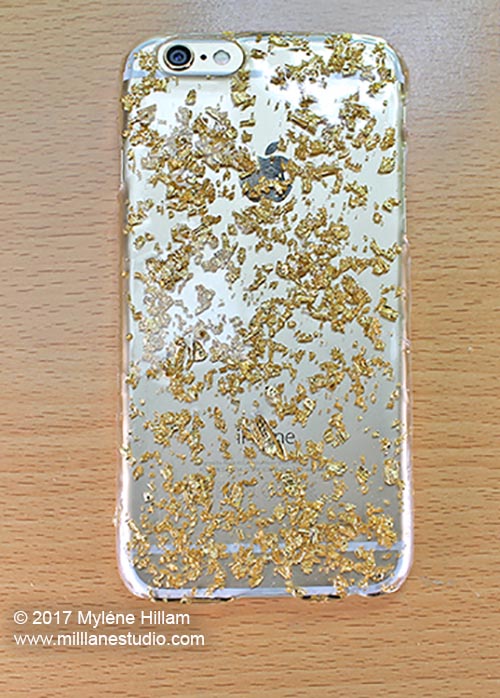
Inside: Learn how to apply resin to a plastic phone case to give it a makeover with gold leaf flakes.
This project is great if you want to personalise your mobile/cell phone or any other portable device. All you need is epoxy resin, gold leaf flakes and a clear plastic case to fit your device.
Supplies
BBQ lighter
Wooden stir stick
Utility knife
Nitrile gloves and protective eyewear
Before you get started, take a piece of course sandpaper and scuff up the outside of the clear plastic case. This will help the resin stick to the glossy plastic. Don't worry... the resin will fill the scratch marks so they won't be visible!
Measure out the resin and the hardener in the ratio for your resin. This project doesn't need a lot of resin so have some extra moulds on hand that you can fill with the excess resin.
Mix the resin and hardener following the instructions in your kit.
Make sure you're working on a non-stick surface like this or the phone case will permanently stick to your workspace.
Apply the resin to the OUTSIDE of the case with the stir stick... you'll have much more control if you drip the resin onto the case rather than pour it from the cup.
Spread the resin evenly over the case using the side of the wooden stir stick. It’s OK if some of the resin goes over the edges because they’ll be covered later anyway.
Briefly pass a gas lighter over the surface of
the resin to pop any bubbles. Keep the flame moving at all times.
Now comes the fun bit: sprinkling the gold leaf flakes onto the resin.
Sprinkle them
from a height to distribute them evenly. For a luxe look, sprinkle on a lot of flakes. If you want to see more of the phone case
through the resin, then go lightly.
Whilst the resin is still liquid, apply another layer on top of the gold leaf. The flakes will move about a bit and some of the resin will flow over the sides so smooth the edges out with the wooden stir stick.
Whilst the resin is still liquid, apply another layer on top of the gold leaf. The flakes will move about a bit and some of the resin will flow over the sides so smooth the edges out with the wooden stir stick.
Flatten down any
bits that are sticking up with the stir stick. If they are sticking up too much, it will be hard to completely cover them with the next layer.
Once the resin stops spilling, move the phone case to a clean spot on your workspace with gloved hands. Now it’s time to
leave the resin to gel. This usually takes a few hours.
Mix up another batch of resin and spread it across the surface.
Once it stops pooling over the edge, move it to a clean spot on your workspace and leave it to cure overnight.
Mix up another batch of resin and spread it across the surface.
Once it stops pooling over the edge, move it to a clean spot on your workspace and leave it to cure overnight.
Trim away any overpour on the edges with a utility knife. You can use scissors if you find the knife too scary.
If there are any drips on the inside of the case, remove those too so that the case fits snugly.
Now your luxe gold metal leaf case is ready to snap into place.
Well that was pretty easy!
Now your luxe gold metal leaf case is ready to snap into place.
Well that was pretty easy!
Want to see the whole process in action? Watch the video below.
The case will take a fair bit of knocking around.
But it's not designed to protect your phone.
And if you drop it, the resin can chip so treat it gently.
If you get scratches on the surface, you can just add another coat of resin and they'll disappear!
Like this project? Pin it for later!


