Bubbles are the bane of every resin crafter's existence... no matter whether you're a resin beginner or you've been working with resin for a while. They can be really frustrating. But there are ways to minimise, or even eliminate bubbles from your projects.
There are many different things that cause bubbles and there are just as many ways to deal with or get rid of them. Half the battle is working out WHY you got bubbles. Once you know why you're getting them, it's a whole lot easier to deal with them.
Try some of these tips and tricks to beat those pesky bubbles.
How to Deal with Bubbles in the Mixing Stage
1. Avoid Vigorous Mixing and Stir Slowly
Resin needs to be mixed thoroughly for it to cure. If you stir fast or whip the resin, you'll incorporate a lot of bubbles into it.
Try stirring slowly. It will take longer, but when you're working with epoxy, you have plenty of time, so stir slowly, and you'll end up with way less bubbles to deal with.
Bonus: For how to avoid bubbles in resin when mixing, check out this post to find out my SECRET WEAPON!
2. Rest the Resin
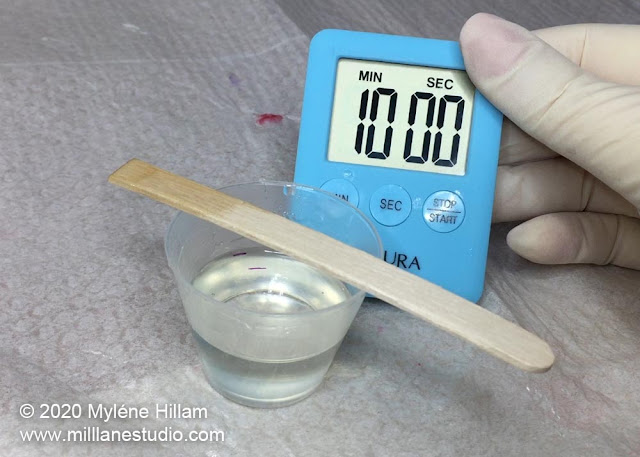
Once you've mixed the epoxy resin, let it sit for 5-10 minutes. Set a timer so that you don't forget it.Most of the bubbles you mixed into the resin will rise to the surface. They're much easier to deal with once they're sitting on the surface of the resin than when they're suspended in the resin.
To see how to pop bubbles on the surface of resin, scroll down to "How to Deal with Bubbles AFTER Pouring"
3. Warm the Resin to Avoid Micro Bubbles
If you've ever mixed resin and it looks cloudy instead of clear, hold the cup up to the light.Most likely, it's full of tiny, microscopic bubbles. These bubbles are so small that they can't rise through the resin to the surface and if there are thousands of them, the resin appears cloudy. This is what happens when you mix cold resin.
If your bottles of resin feel cool/cold to the touch, try warming them in a container of warm water.
If your bottles of resin feel cool/cold to the touch, try warming them in a container of warm water.
Here's how to warm your resin:
- Fill a container with warm to hot tap water
- Make sure the lids are tightly on your bottles so no moisture can get inside them.
- Place the bottles in the water for 10 minutes
- Remove and dry the bottles.
The bottles should no longer feel cool. Now you can go ahead and mix the two parts together. Don't forget to refer to the instructions in your resin kit - they will tell you the optimum temperature for working with your resin.
Warning: Never mix hot resin. If the bottles feel hot, let them cool before mixing the two parts together.
How to Deal with Bubbles AFTER Pouring
Mixing resin isn't the only place where you'll encounter bubbles. Even if you have no bubbles after mixing, there are still other ways that bubbles can be introduced into the resin, so having some tricks up your sleeve to deal with them is essential.
4. Drag Them Out of the Resin
When you put textured items into resin, quite often, a bubble will get trapped against the surface of the object.You can avoid that happening by "painting" a thin layer of resin onto the object with a stir stick before placing it in the mould.
If you still manage to get a bubble, use a toothpick to dislodge it and then drag it out to the edge of the mould where you can remove it from the resin.
Happy Resining!

Subscribe to my email list and learn how to resin like an expert.
Expert Tip: You can also run the toothpick around the bottom edges of the mould to dislodge bubbles that get caught between the side wall and the bottom of the mould. Then you won't have holes along the front edges of your pieces when you demould them.
5. Use a Straw
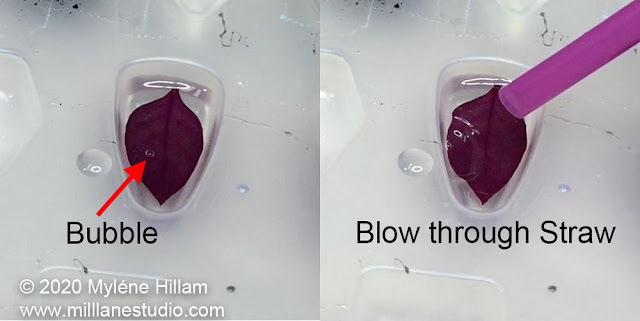
Once bubbles reach the surface, you can blow through a straw to pop them. The carbon dioxide in your breath will pop them.
6. Use a BBQ Lighter or Butane Torch
This is one of my favourite tricks because it's so quick.
If you're working in a mould, use a BBQ lighter, a gas torch or other small naked flame.
For medium projects, like a charcuterie board or a small resin painting, you can use a chef's butane torch.
If you're working on a larger project, like a resin-coated kitchen benchtop or a large piece of resin art, use a butane torch.
Pass the flame BRIEFLY across the surface of the resin. Use a back-and-forth motion so that you keep the flame moving across the resin surface at all times and don't linger in one spot. You'll see the bubbles pop magically before your eyes!
This works by warming the resin, making it more viscous so the bubbles rise to the top. But take care: if you overheat the resin or if the silicone mould gets too hot, it can fuse the resin to the mould permanently.
7. How to Get Rid of Bubbles in Resin with Alcohol
If you're uncomfortable using a flame on the surface of the resin, then this tip might be for you. You can use rubbing alcohol (also known as isopropyl alcohol) to remove resin bubbles.
Fill a spray bottle with rubbing alcohol and spritz it across the surface of the resin.
You might be thinking, "Why do you spray alcohol on resin?"
Well, the alcohol breaks the surface tension causing the bubbles to pop and you'll see the bubbles on the surface pop, right before your eyes.
Well, the alcohol breaks the surface tension causing the bubbles to pop and you'll see the bubbles on the surface pop, right before your eyes.
And being alcohol, it quickly evaporates without affecting the resin and leaves no trace of alcohol at all. What a NEAT TRICK!
Rubbing alcohol is available in many different concentrations. I've used rubbing alcohol as low as 64% and it still works, so anything above this will do the job.
And here's a BONUS TIP:
Use a Heat Gun to Pop Bubbles
I prefer to do this in the mixing cup rather than when the resin is in the mould.
Why?
Because the temptation is to concentrate the heat too long in one spot to pop a stubborn bubble. This can cause the resin and the mould to fuse together permanently. And then the only way to remove the resin is to destroy the mould.
So, just give the resin in the cup a short burst with the heat gun and you'll see most surface bubbles pop.
Watch the video to see all these tips in action!
Now you have a host of different ways of dealing with bubbles. Go forth and create bubble-free resin projects!
Pin These Tips!
Happy Resining!

Subscribe to my email list and learn how to resin like an expert.


Thanks so much for your amazing tips with resin, I’ve been dabbling with it for a while now but I’m still learning! I’m very grateful that you are kind enough to share your knowledge and experience with us! Stay safe and healthy and have a good 4th of July! Liz
ReplyDeleteLiz, thank you so much for your kind words. I'm glad you found these tips useful.
DeleteIf you'd like to fast track your resin journey, my online classes at www.resinmadesimple.com will really escalate your understanding and confidence in using resin.
Take care, and happy resining!
Myléne
This is great, thank you! I’ve also been using resin for a few years but have not been able to achieve that glasslike surface. Your tips are easy to remember and so simple that I feel foolish for not thinking of them. Thanks again! I’ll be trying these today. ��
ReplyDeleteI'm glad you're finding the tips useful, Theresa. I have another one that might also help... and it is so simple that you'll kick yourself for not thinking of it. Check out this blog post on how to MIX RESIN WITHOUT BUBBLES: https://milllanestudio.blogspot.com/2020/04/how-to-mix-resin-without-bubbles.html
DeleteI tried the rubbing alochol and my resin never properly cured (it was b/c of the alcohol b/c I did some pieces with no alcohol and it cured perfect)
ReplyDeleteA LIGHT spritz with rubbing alcohol over the resin won't affect the resin curing. It will evaporate in just minutes.
DeleteIf you've had a problem with the resin not curing, then you need to look at other possible causes.
If this was the exact same mixture of resin that you poured into several different moulds and ONLY THE ONE DIDN'T CURE, then it may be that you've scraped unmixed resin off the sides of the cup and it's ended up on the surface of the resin.
If it was a different mix of resin, then you may have inaccurately measured the resin OR not blended it well enough for the chemical reaction to cure it.
If the uncured resin is only on the surface you might be able to save your piece by applying a clear layer of resin over the surface.
I hope that helps you for your next batch.
Myléne
Many thanks for the tips. I will try rubbing alcohol spray!
ReplyDeleteGlad the tips have helped, Denise. The rubbing alcohol spritz is a game changer!
DeleteAvoid using wood sticks to stir your resin. Wood is porous and will introduce bubbles. Get some plastic or silicone sticks which are relatively inexpensive and reusable. Makes a huge difference.
ReplyDeletethanks for this, the crazy part is that the makers put the wooden sticks in the box with the resin.
DeleteThank you so much!!
ReplyDeleteYou're welcome.
DeleteHI I WANTED TO TRY YOUR RUBBING ALCOHOL TIP BUT I READ SOMEWHERE THAT MIXING OF HARDENER AND RESIN IS HIGHLY EXOTHERMIC AND AS ALCOHOL IS FLAMMABLE, IS IT SAFE TO SPRAY ALCOHOL ON IT? ALSO, WILL MY PIECE CURE PROPERLY OR WILL ALCOHOL AFFECT THAT?
ReplyDeleteWhen you lightly spray rubbing alcohol on your resin, it breaks the surface tension so the bubbles pop. The alcohol evaporates very quickly and doesn't seem to leave any residue on the surface or affect the curing process.
DeleteLarge batches of resin produce a large amount of heat and can flash cure, but as long as you stick to less than the maximum amount recommended in your resin instructions (and don't leave it sitting in the cup), this shouldn't happen. So a light spray with rubbing alcohol shouldn't cause any concerns
THANK YOU SO MUCH!!!! WILL DEFINITELY TRY THIS ALCOHOL TIP!
ReplyDeleteYou're welcome, Monalika. The rubbing alcohol tip is a game changer!
DeleteHi Myléne,
ReplyDeleteI am a newbie at resin and I have a lot to learn. I have been reading all of your tips and tricks, have applied them to my resin projects and it has made a big difference in the outcome. I will definitely give the alcohol tip a try. Thank you so much for all the helpful advice that you provide.
I'm glad the tips are helping.
DeleteHave you subscribed to my email list for even more tips delivered straight to your inbox?
Here's the link to sign up: https://page.co/i037xd