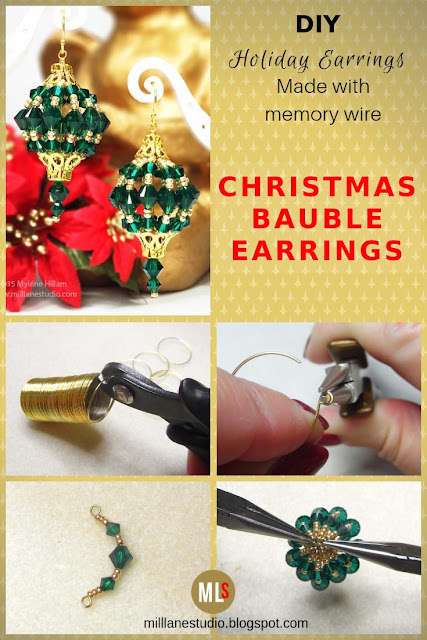
Finished length: 6cm (2 3/8")
Skill level required: Advanced
Here's what you need to make the Emerald Bauble earrings:
- 24 x 6mm Emerald Swarovski bicones
- 46 x 4mm Emerald Swarovski bicones
- Tube of 11/0 Metallic Gold Czech Seed Beads
- 2 x 7mm gold filigree basket bead caps
- 2 x 9mm gold filigree basket bead caps
- Gold ring-size memory wire
- 4 x 6mm gold jump rings
- 2 x 70mm gold head pins (see this tutorial for how to straighten bent head pins)
- 2 gold earrings wires with ball ends
Tools:
Memory wire shears, round nose pliers, two pairs of chain nose pliers, flush cutters
Use the memory wire shears to cut eleven full rings from the tube of memory wire.
Turn an outward facing loop on one end of each one. The loop must be completely closed with the cut end of the loop butting against the curve of the memory wire.
String three seed beads, a 4mm crystal, two seed beads, a 6mm crystal, two seed beads, a 4mm crystal and three seed beads on each ring.
Slide all the beads up to the loop and trim the memory wire just long enough to turn an outward facing loop, approximately 7 or 8mm (5/16").
There should be no gap between the last bead and the loop. Form loops on the other beaded rings.
Open a jump ring and hook on the eleven beaded memory wire components, making sure they are all facing the same direction.
Close the jump ring.
Open another jump ring and hook the other end of each component onto it. This will be really fiddly but just be patient and take your time getting the last few to stay on the jump ring. With a pair of pliers in each hand, close the jump ring. You may have to reposition one of your pliers three or four components away from the other pair of pliers in order to close it.
String a seed bead, a 4mm crystal, a 6mm crystal and the large bead cap on a head pin. Insert it through the two jump rings of the bauble and then string a small bead cap.
Grip the head pin above the bead cap and bend it above the pliers, creating a small neck.
Form a loop....
grip the tail of the head pin with chain nose pliers .....
and wrap it around the neck until the bead cap sits firmly against the bauble.
Trim away the excees wire. Attach the bauble to the earring wire.
Now make a second earring to match.
These earrings would look fabulous made up in red and silver, blue and silver or even gold and silver. But whatever colour combination you choose, you will really make a statement wearing them - there is absolutely no doubting that they are Christmas baubles!
Pin this Project!
'Til next time.....

Want to learn how to make jewellery? Click here to find my books and printable pdfs


